System Reports
- Former user (Deleted)
- Geoff Gaylard (Unlicensed)
- Harvey Mediran
- Brevity Care Software
Reports can be managed via the Reports menu. Columns in particular reports can be added and deleted. Reports can also be set to be used in Bulk Email Notifications.
.jpg?version=1&modificationDate=1528333550870&cacheVersion=1&api=v2&width=412&height=250)
These are the topics on this page:
Managing System Reports
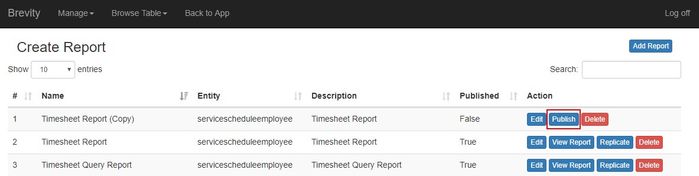
In the Reports window, you can a new report by selecting the "Add Report Button", or edit an existing report information by selecting the corresponding "Edit Button". You can also view a report when shown in the system by selecting the "View Report Button", copy a Report by selecting the "Replicate Button" or delete a report using the "Delete Button". You can also search for a report using the "Search Field", by typing the name of the report.
.jpg?version=1&modificationDate=1528334437291&cacheVersion=1&api=v2&width=502&height=250)
Adding or Editing a report
The first screen you will see when creating or editing a report, is the report properties screen. This allows you to set the following properties for the report:
- Report Name: the name of the report
- Description: report description shown in the report list to users to explain the purpose of the report
- Primary Entity: the primary table containing data to be reported on
- Orientation: whether the report will be printed in Portrait or Landscape. The page size is always A4.
- Default Filter Column: optional date column to be used when the date range filter is selected by users when running the report
- Report Type: the report category
- Use for Bulk Email: whether or not users are allowed to email the report to clients or employees

Clicking the Save changes button will save report properties and will redirect you to the builder screen. This allows you to set the information that will display on the report:
- Report Header Field (optional): groups and displays report on the field here. This information is shown as a heading above the table
- Report Groups (optional): groups information within the table on the fields added here. You can add multiple fields here and these will display hierarchically as configured
- Report columns: Can be dragged from the blue column list on the right to build the report table. You can add information from related tables by selecting the related table in the Entity dropdown, to show the related fields for this table. You can also double click the column once added to the report to set additional properties. See the Column Properties section below in this document for more details
- Report Filters (optional): Predefined filter to specify what information to show on the report

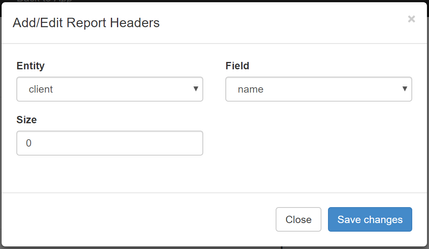
Adding/Editing Report Headers and Groups
The following popup box will display when adding a report header or groups. It allows you to select which table and field to retrieve the data from. You can also select the column size, which will be used for group column on the report table.
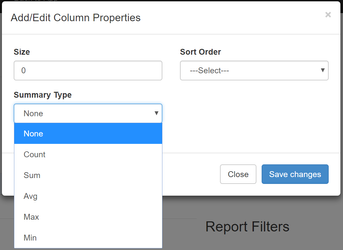
Column Properties
The following properties can be set for report columns. You can see this by double clicking on the report column.
- Size: width of the column within the report table
- Sort Order: set ordering based on this column. Please note that by default the report is ordered by the report header column (if set), the report group columns (if set), and then by the report column order based on the order they display on the table
- Summary Type: if set will display a total row for the first report group and report header and will show summary information for this column in the total row
Publishing the Report
After editing / replicating the report, you need to publish the report so you can use the report. If you don't publish the report, you cannot use the report. From the list of reports, click on the publish button to publish the report.
Related content
Copyright © 2019 Brevity. All Rights Reserved