System Workflows
- Anne Pascual (Deactivated)
- Harvey Mediran
- Former user (Deleted)
System Workflows allow you to execute custom logic when records are added, updated or deleted. This can be updating data within the system, creating new records or sending emails.
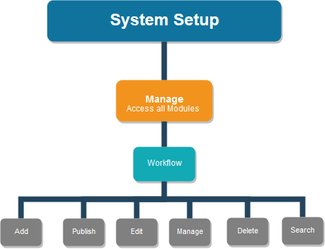
Clicking on the sub-menu - ‘Workflow’ from the main navigation menu - ‘Manage’, you will be able to view the landing page for the Workflow Management.
.jpg?version=1&modificationDate=1528270689438&cacheVersion=1&api=v2&width=429&height=250)
.jpg?version=1&modificationDate=1528271323818&cacheVersion=1&api=v2&width=748&height=250)
These are the topics on this page:
Managing System Workflows
In the Workflow window, you can search for a workflow data through the "Search Field", edit the entity data, manage the data workflow on the an existing information, or completely delete a workflow function. You may also add a new data workflow for the system to use.
 - The 'Add Script' Button lets you create a new workflow. For an in depth guide, please visit Adding / Editing Workflow
 - The 'Edit' Button lets you edit the details of the corresponding workflow. For an in depth guide, please visit Adding / Editing Workflow
 - The 'Manage' Button lets you manage the corresponding workflow. For an in depth
 - The 'Delete' button lets you delete the corresponding workflow. For an in depth guide, please visit Deleting a Workflow
Adding / Editing Workflow
This section will allows you to add the new Workflow.
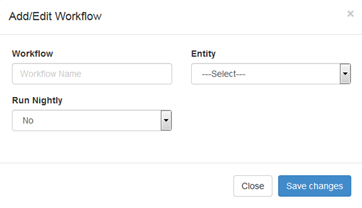
Clicking on the ‘Add Workflow’ button from the Workflow Management landing page, you will be able to add the new Workflow by submitting the following information:
- Workflow: Enter the name for a Workflow.
- Entity: Select the entity from the dropdown for which the Workflow to be created.
- Run Nightly: Select ‘Yes’ or ‘No’ to run.
Click on ‘Save Changes’ button to add the new Workflow. The newly created Workflow will be added to the Workflows list as shown below.
Click on ‘Save Changes’ button to add the new Dashboard. The newly created dashboard will be added to the dashboards list.
Manage a Workflow
This section allows you to manage the structure for workflows. Click on the ‘Manage’ button from the ‘Workflows Listing’ screen to open ‘Manage Workflow’ section.
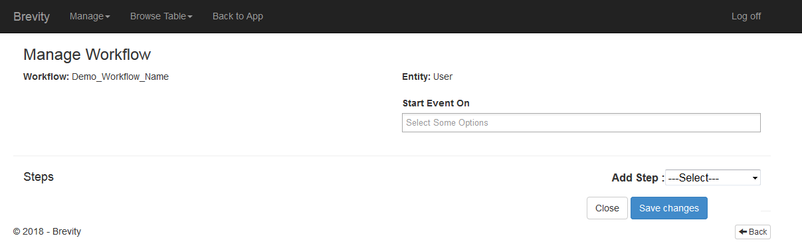
By default, displays following information to you:
- Workflow Name
- Entity Name
Follow the below steps to define the structure for Workflow:
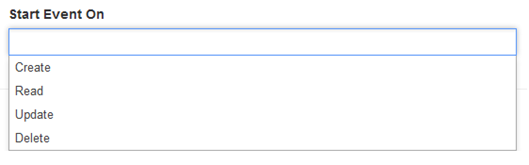
Step 1: Start Event On
Select the one or multiple triggers to start event. You can select any of the following triggers:
- Create
- Read
- Update
- Delete
Step 2: Add Step
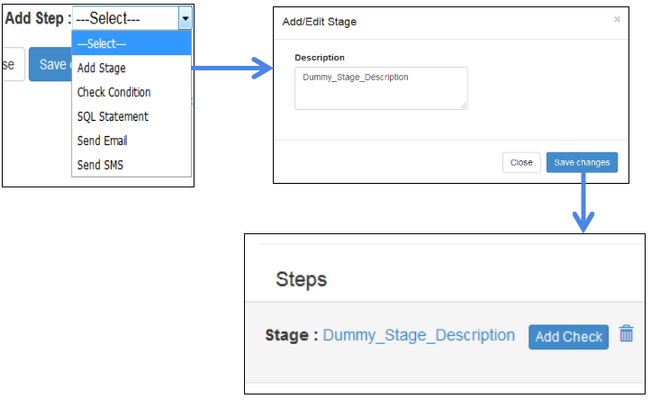
Select the steps to be taken after the trigger event occurs from the Step 1. Select steps following order:
- Add Stage: Select the ‘Add Stage’ option from the “Add Step” dropdown and submit the following details:
- Description
Click on ‘Save Changes’ to add the stage.
Add Check Condition: Once the Stage is added, you need to add the Check Condition. Click on the ‘Add Check’ button or Select the ‘Check Condition’ option from the “Add Step” dropdown and submit the following details:
- Description
- Apply Rules (Please refer the Section View Builder Table Rules for more details about how to apply rules)
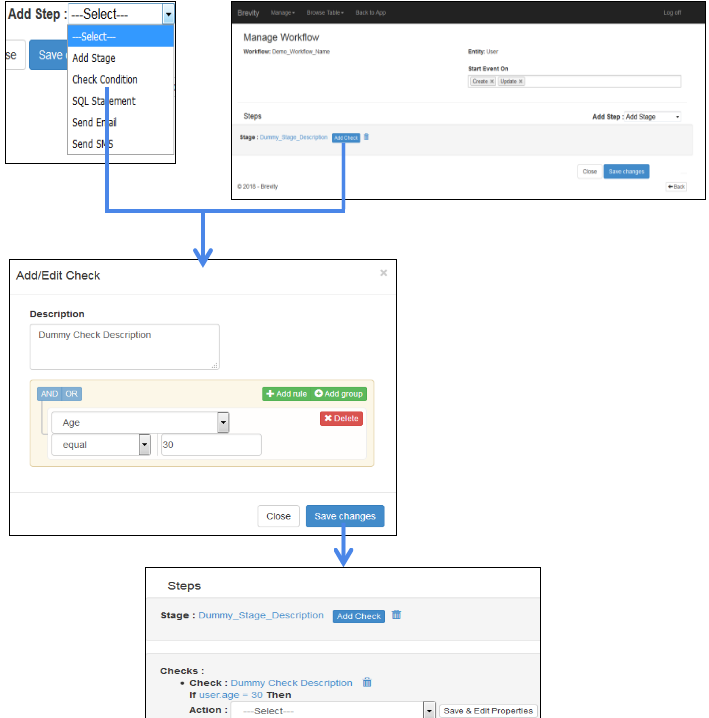
Click on ‘Save Changes’ to add the Check Conditions.
Action: After adding the Stage and the Check Condition, you need to select the action to be taken. You can add any of the following action(s):
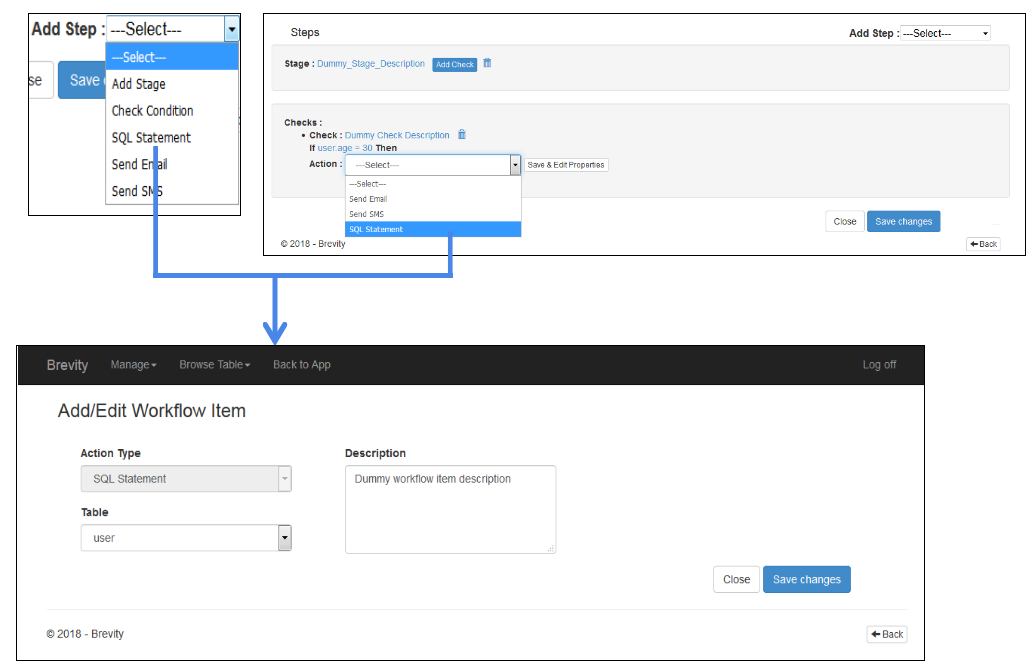
SQL Statement: Follow the below steps to add ‘SQL Statement’ action:
- Step A: Select the ‘SQL Statement’ option from ‘Action’ or ‘Add Step’ dropdown to add the ‘SQL Statement’ action. After selecting the ‘SQL Statement’ option, you will be taken to Step B.
- Step B: Complete the form by submitting the following information:
- Action Type (Read Only): Displays the ‘SQL Statement’ as the action type
- Table (dropdown selection)
- Description
- Step C: Click on ‘Save Changes’ to save the form. After clicking on the ‘Save Changes’ you will be taken to the Step D.
- Step D: Default ‘Entity’ Details: This section consists of the following modules:
- Form: Display the system generated form for the selected Table in Step B. You need to add the tags in all the form fields.
- Entity: Select the entity from the dropdown.
- Column: Display the fields of the selected entity. Select the field to view the tags.
- Tag: The tag will be displayed for the selected Column Field.
- Add: Select the Form Field and Click on the ‘Add’ button to copy the Tag into the Form Field.
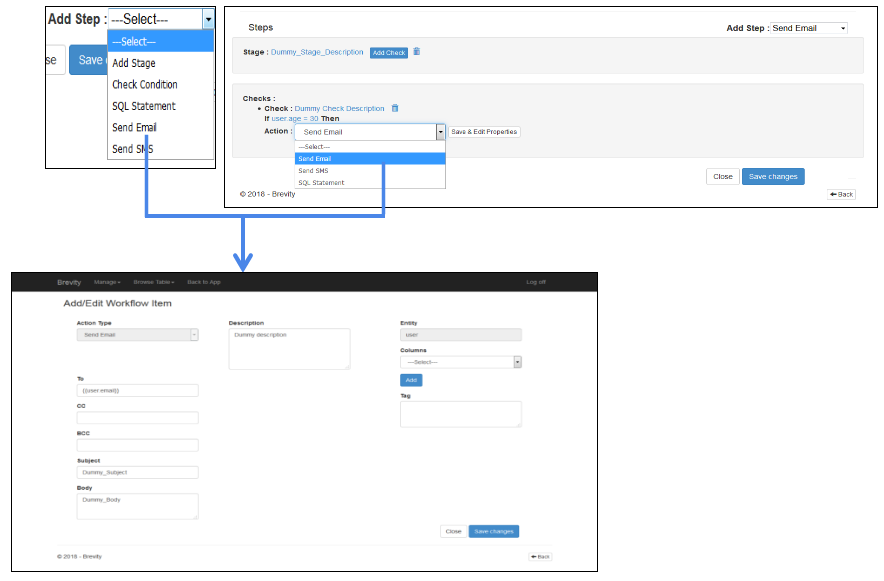
Send Email: Follow the below steps to add ‘Send Email’ action:
- Step A: Select the ‘Send Email’ option from ‘Action’ or ‘Add Step’ dropdown to add the ‘Send Email’ action. After selecting the ‘Send Email’ option, you will be taken to Step B.
- Step B: Complete the form by submitting the following information:
- Action Type (Read only): Displays the ‘Send Email’ as the action type.
- Description: Enter the description.
- Form: Display the system generated form for ‘Send Email’ action with following fields. You need to add the tags in all the form fields wherever necessary.
- TO
- CC
- BCC
- Subject
- Body
- Entity (Read only): Display the entity selected at the time of Workflow creation.
- Column: Display the fields of the selected entity. Select the field to view the tags.
- Tag: The tag will be displayed for the selected Column Field.
- Add: Select the Form Field and Click on the ‘Add’ button to copy the Tag into the Form Field.
- Step C: Click on ‘Save Changes’ to save the form.
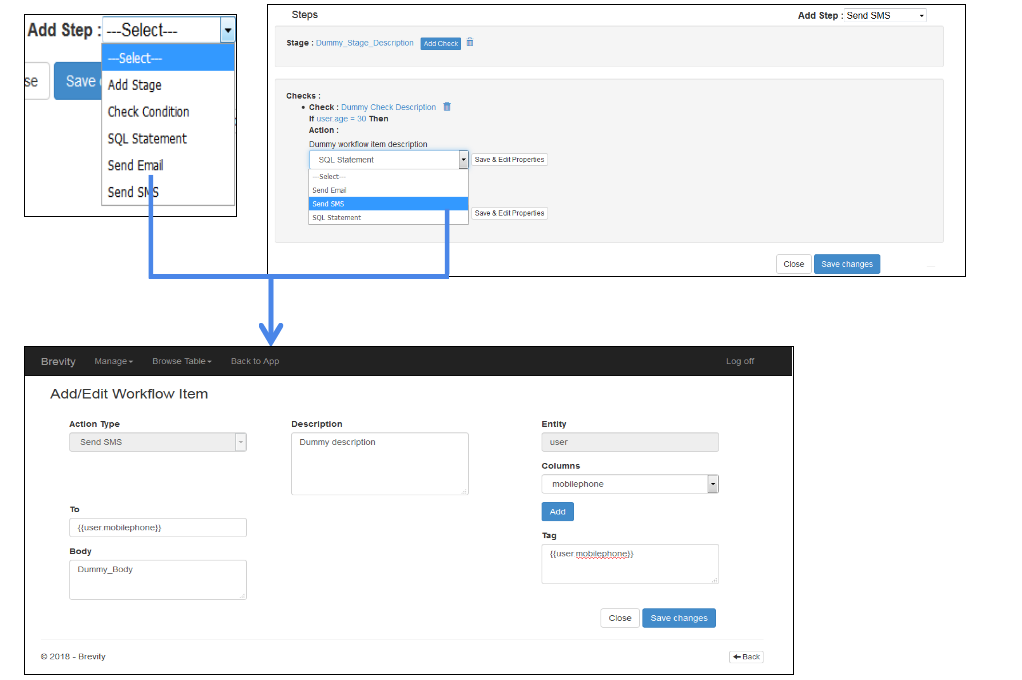
Send SMS: Follow the below steps to add ‘Send SMS’ action:
- Step A: Select the ‘Send SMS’ option from ‘Action’ or ‘Add Step’ dropdown to add the ‘Send SMS’ action. After selecting the ‘Send SMS’ option, you will be taken to Step B.
- Step B: Complete the form by submitting the following information:
- Action Type (Read only): Displays the ‘Send SMS’ as the action type.
- Description: Enter the description.
- Form: Display the system generated form for ‘Send SMS’ action with following fields. You need to add the tags in all the form fields wherever necessary.
- TO
- Body
- Entity (Read only): Display the entity selected at the time of Workflow creation.
- Column: Display the fields of the selected entity. Select the field to view the tags.
- Tag: The tag will be displayed for the selected Column Field.
- Add: Select the Form Field and Click on the ‘Add’ button to copy the Tag into the Form Field.
- Step C: Click on ‘Save Changes’ to save the form.
Publishing a Workflow
Once you are done with the complete structuring of Workflow, you can publish the Workflow so that it will be created in the database with the structure defined by you.

After publishing the Workflow, the ‘Publish’ button will be removed from the Action buttons. You won't be able to revert the changes once published.
System Workflow
This section displays the listing of all the Workflows created by you with the following details:
- Id: Displays the serial number for each Workflow.
- Name: Displays the names given to the Workflows.
- Entity: Display the name of the Entity for which the Workflow created.
- Run Nightly: Displays either ‘Yes’ or ‘No’
- Yes:
- No:
- Is Published: Displays the Boolean value as either ‘True’ or ‘False’
- True: Represents that the Workflow has been published. It means the Workflow has been created in the database with the defined structure.
- False: Represents that the Workflow has not yet published.
- Action: You can take the following actions on the created Workflow:
 Refer 'Managing System Workflow' section above for more details.
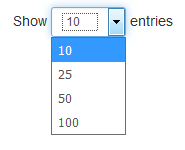
- Number of Entries per page: Select the number of entries for the Workflow to be shown on the ‘Workflow Listing’ page. Select any of the following to select no. of entries per page:
- 10: If selected, 10 Workflows per page will be displayed.
- 25: If selected, 25 Workflows per page will be displayed.
- 50: If selected, 50 Workflows per page will be displayed.
- 100: If selected, 100 Workflows per page will be displayed.
At the bottom of the list, you will be able to see the slot of the entries you are currently viewing.

- Sort: Clicking on any of the column headers from the grid, you will be able to sort the listing in Ascending or Descending order.

- Pagination: Pagination feature allows you to view the entries from all the pages if present. Clicking on the ‘Next’ button, the entries from the next page will be loaded and clicking on the ‘Previous’ button, the entries from the previous page will be loaded. You can view the entries of a specific page by clicking on the respective Page Number.

- Back: You will be taken to the last page visited by clicking on ‘
 ’ button.
Searching a Workflow
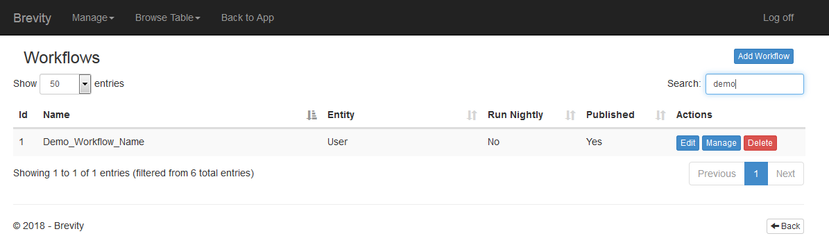
Search feature will allow you to quickly find the needed workflow(s).
You need to enter the search keywords in the below Search Input box and instantly the workflows list will be filtered as per the keywords and shows you the required workflow(s).
Deleting a Workflow
You can delete the existing workflow by clicking on the ‘Delete’ button present across the workflow. Clicking on the ‘Delete’ button, you will be prompt for the Workflow delete confirmation. Once you select ‘Continue’ option, the selected Workflow will be deleted from the system.

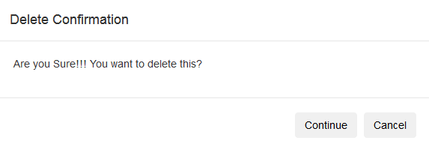
Deleted Workflow(s) cannot be retrieved again. Be sure before deleting.
Table of Contents:
Copyright © 2019 Brevity. All Rights Reserved