The client funding record will reflect the details of the service agreement you have signed with the client and is a required step when setting up NDIS clients within the system. It will include the client NDIS number for bulk claiming, dates between which the services will be delivered, all the services that the client is funded for, and the budget for each service.
Every service that you deliver will be drawn down from the client funding. The system will ensure that services are only delivered between the funded period and will also ensure that you do not exceed the available budget.
In this step, we will look at setting up a new client funding record for the client.
These are the topics on this page:
Open Client Record
If not already open, open the client record that you want to manage the funding for by hovering over the Clients Menu, select the Clients sub-menu item.

You will be redirected to the Clients list window, search for the name of the client under the Search Field box. You can click on the edit button or double click on the client's name to open the record.

Adding the Client Funding
On the lower right part of the Client profile screen, there is a Client Funding section. Select the blue Plus Icon above the list to add a new client funding record. You should create only one client funding record per service agreement, with all services from the service agreement added to it.

You can also create a client funding by using the Client's Quick Menu. Click on the Client Funding tab from the quick menu and then Click on the +New Button

A Client Funding screen will pop-up. Fill out all the information as follows:
- Type: Select Individual
- Client: Will auto-populate with the client name and doesn't need to be changed
- Registration Number: Enter the clients NDIS number here
- Funding Source: Select NDIS
- Pricelist: Select the price list that will determine the charge rates for services delivered to the client, as per the service agreement
- Start Date: Start date of the service agreement
- End Date: End date of the service agreement
- Budget: Total budget of all services
Click Save to create the record.

Please note: You must publish the client funding before you are able to use it for rostering. You can unpublish at any time if you need to make changes, which will unpublish related services on the roster as well. This ensures the rostered services still fall within the parameters of changes you have made (date or budget changes).
Adding Service for the Client Funding (Important)
After Saving the Client Funding information, the Services section at the bottom of the screen will now be available, that allows you to add all the services that the client is funded for - these will be used for tracking the budget as well as determining the correct NDIS support numbers to use when generating claims from Brevity.
When adding the service types, you should select the weekday service code and if after hour rates are allowed. The system has built-in rules to look up the correct NDIS Support Item Numbers when generating the claims for services rostered for after hours (i.e. Weekday A/h, Saturday, Sunday and Public Holiday).
Under the Services Section, select the "Plus Icon" to open in the Services Information window. This can be repeated multiple times to add as many services as you need.

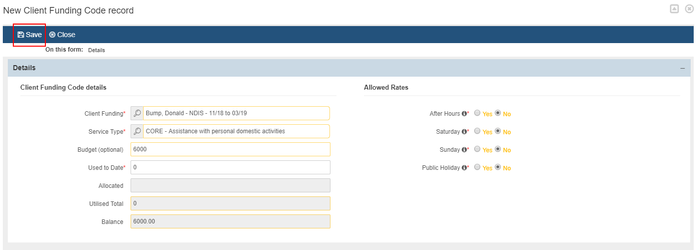
Fill-out the information as follows:
- Service Type: select the name of the funded service from the service agreement. If you not sure you can click the search icon and search using the NDIS Support Number. Brevity automatically manages to claim for after-hours codes - you just need to select the normal hour Support Item, and specify if after hours are allowed using the options on the right. For services that NDIS does not pay after hour rates for, the option will be disabled by default. You can enable these if you wish - click here for instructions on how to do this.
- Budget: enter the budget for this service from the service agreement
Click Save to add the service. Click Close to return to the Client Funding screen to see this service now added to the list. You can click the plus again to add additional services. You can also double-click an item in the list to modify it.
You can close the Client Funding pop-up window when done adding all the funded services, to return to the Client profile screen.
Publishing the Fund
Before you can use the fund of the client, you need to publish the fund. After creating the client funding detail and creating service for the client fund, click on the publish button so it will be available for rostering.

A confirmation window will pop up. Click Ok to confirm publishing the fund.
Editing the Client's Fund
If you need to change the details for the client's fund, you should click on the unpublish button first before you can start editing the fund. You cannot edit the client's fund if you don't unpublish the fund.

A confirmation window will pop up. Click ok to confirm.
You need to save the changes that have been done with the client's fund. Click the save button to save the changes.

Click publish so it would be available again for rostering