The following instruction will guide you through the steps involved in establishing your organisations first NDIS client within the Brevity Care application. This guide makes the assumption that you have already entered employee information into Brevity and that the service type and pricelist records are valid.
Introduction
This instruction will involve the following steps
Setting up the client.
Setting up the clients funding in accordance with the services and costs outlined in the service agreement.
Setting up a service template to manage ongoing client services that support the clients care plan.
Managing the roster from week-to-week to ensure client services are delivered as per the service agreement.
Managing service delivery and reporting.
Generating NDIS bulk claims.
Processing remittance advises.
Before starting it is important to understand the data recording requirements for each of the Support Categories under the NDIS. Brevity Care helps you meet all organisation and NDIS mandatory data recording and reporting requirements. It simplifies and reduces the administrative burden so you can concentrate on what is important - providing the best level of care to your clients.
| Expand | ||
|---|---|---|
| ||
For all core supports (excluding complex supports), these are episodic (recurring weekly or fortnightly) and will be adequately evidenced through the service agreement and roster or timesheet log. It will be important to record within the service agreement the duration, ratios (staff to client) and cost of each service. For every service delivered under core supports you will need to document, as appropriate, staff to participant ratios, support worker timesheets, group rosters, and case notes detailing activities and skill building. For capacity building (and complex core supports), you will also need to also adequately evidence service within the service agreement as noted above. These types of supports (as well as assistance with social and community participation) will typically require both a log or roster and a case note as evidence of quantity and type. Where the delivery of these supports results in the delivery of a report or assessment to the participant, additional documentation may not be required if the participant name and NDIS number, date(s), times and quantity of the support type are documented within the final report/assessment For capital support (as well as consumables), these should be invoiced to the participant. Invoices with the participant’s name, NDIS number and the date of delivery may not require additional evidence of quantity or support type. You should generate these from within your accounting system. For coordination of supports delivered to a participant in conjunction with any other support delivery the provider must retain documentation of the following:
|
| Expand | ||
|---|---|---|
| ||
| Info |
|---|
Please Note: you will need to renegotiate the service agreement if there are any pricing or service delivery changes required while you have an active service agreement with a client. |
Step 1: Create a Client
To create your client observe the following steps:
select the Clients>Clients sub menu to open the Client List page.
Click the
 New button to create a new client profile. For additional information refer to the topic Client Profile .
 Fill in the mandatory fields as marked with the * as well as any other fields that are required by the organisation.
Once the data entry is complete select the
 button.
Step 2: Add Client Funding
The client funding record reflects the services and budgetary details that the client signed as per their service agreement during the quoting phase. Establishing funding is a required step when setting up your NDIS clients within the Brevity Care system. The funding record will include the client’s NDIS number which is used for bulk claiming, the period for which the services and supports will be delivered, the services and supports that the client is funded for, and the budget associated with each of client’s services and supports.
Every service that you deliver will be drawn from the client’s funding. The Brevity Care system will ensure that services are only delivered for the funded period, which includes after-hours, weekends and public holidays, and that the services raised do not exceed the available budget.See Add client funding page
Refer to the topic Client Funding record for additional information.
Step 3: Add a Service Template
As you know, the NDIS supports the client to achieve both short term as well as longer term goals, and as an NDIS service provider, the preparation and management of care plan that incorporates the delivery of agreed and regular services, that supports the client in achieving their goals, is an important step.
The maintenance of a service template, albeit optional does make it easier to the manage the services that you have agreed to deliver to the client at periodic or scheduled intervals.
To establish a template of the client’s services observe the following steps:
Search for the client record that will be assigned the funding record.
Select the
Add new record icon to create a new Service Template for the client.The Service Template form will present and auto-populate for you click the Save button to create the record.
After saving the record, the Items tab will become available. This section allows you to add the service lines that are used to roster support workers who will deliver services to the client on a recurring basis during the agreed service period. Click the
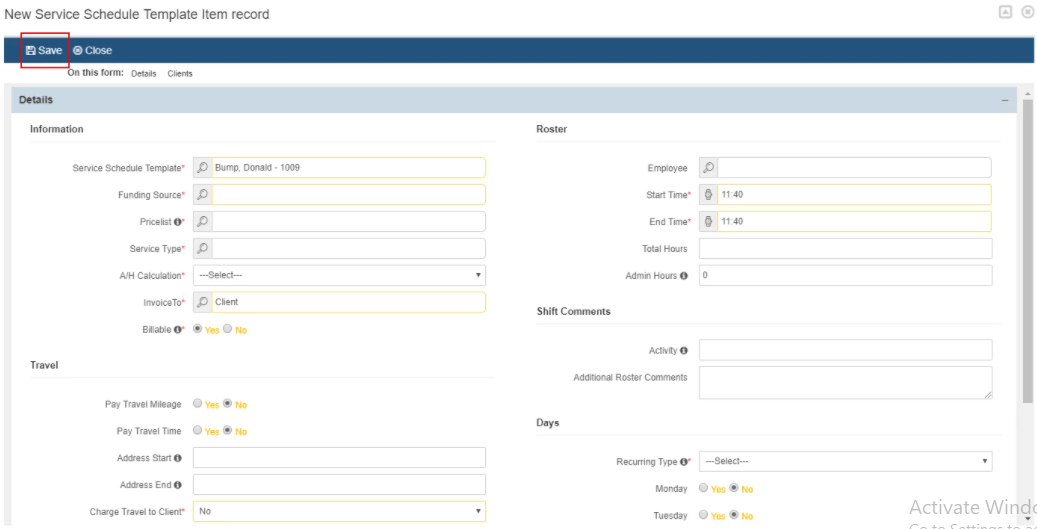
Add new record icon above the list to add a new item. Repeat this process until all agreed service lines have been registered against the service template.Key in all necessary information within the information, travel, roster, activity and days sections groups and then select the "Save Button" to register the service line against the Service Template.
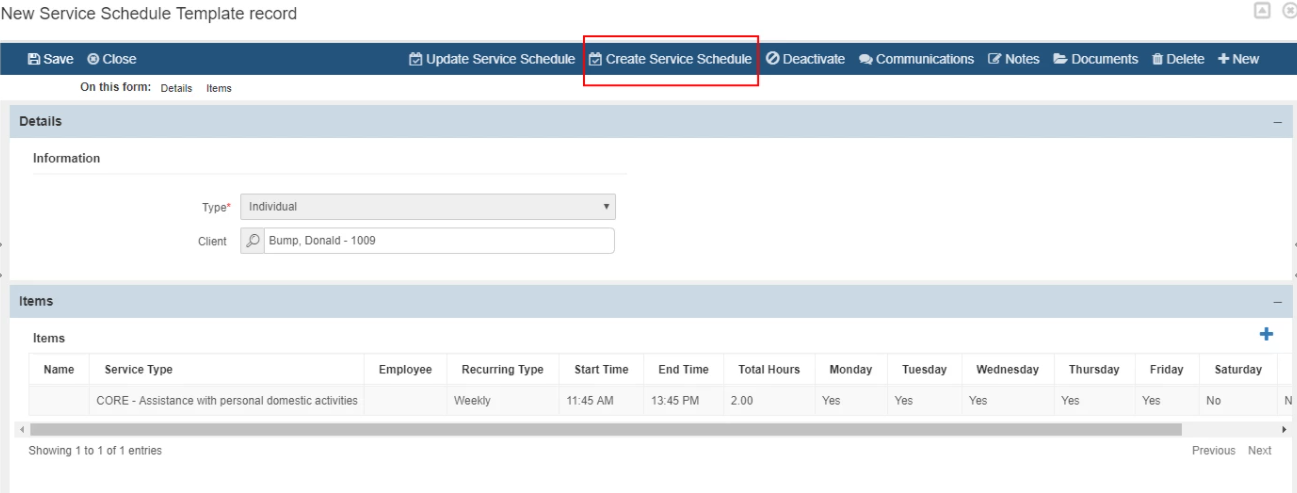
Select the "Close Button" to exit back to the Service Template window, to repeat the process of establishing additional service lines click the
Add new record icon.After you have completed adding the service lines Items to the template, you can use this information to generate the client roster, to do this click the "Create Service Schedule Button" on the toolbar. This will open the Create Service Schedule from Template screen.
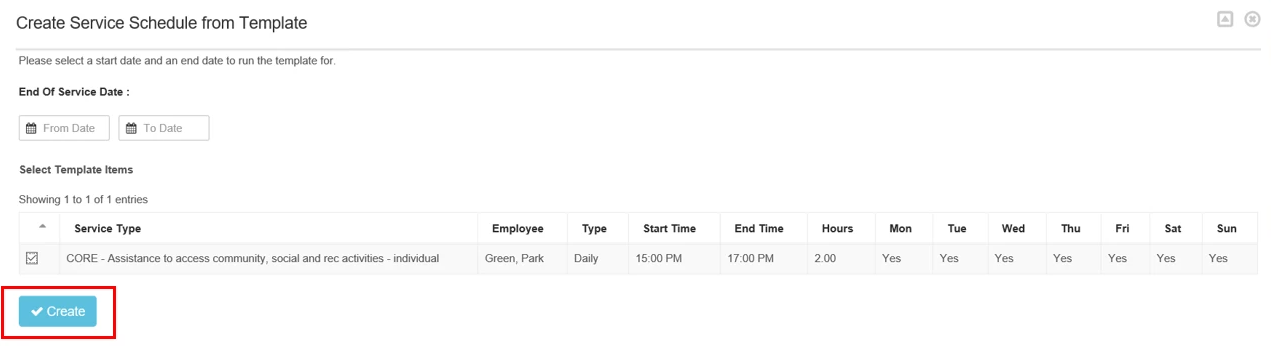
On Create Service Schedule from Template screen, select the start and end dates for which services will be scheduled for, as well as the items that are being scheduled. Click the Create button to run the copy and to create the client's service schedule. Select the "Close Button" in the bottom right corner of the window to close.
The roster for the client has now been created and can now be reviewed through the Schedule Board.
| Expand | ||
|---|---|---|
| ||
|
Step 4: Managing the Roster
The best way to manage the roster within the Brevity Care web application is via the Schedule Board, which provides a calendar view of all services the organisation has listed either by the week, fortnight, or month. Services can be viewed either by support worker, group or client.
The Schedule Board has a number quick action functions, accessible from the shift panel that allow you to easily manage both day-to-day service delivery tasks as well as perform bulk scheduling changes. Shift information can be quickly and easily found with the assistance of several views and filter options.
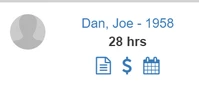
Within the client section on the board there are a few links for easy management of the client and their service setup.
- Clicking on the client's name lists the client record.
- The hours displayed are the number of service hours scheduled based on the selected calendar view (weekly, fortnightly or monthly).
- The icon enables you to access and review the client's service template record(s).
- This icon enables you to access and review the clients funding record.
- This icon enables you to view all upcoming service for the client. This screen supports the application of bulk action on selected services.
Clicking on the user image will select/deselect all service for the client
Step 5: Completing Shifts & Shift Reports
Brevity will only generate a claim file for completed shifts.
Brevity recommends that as part of the timesheet approval process that you review the hours reported by the support worker in relation to the service that was delivered to the client. Furthermore timesheet processing should occur twice weekly, or at a minimum weekly, so as to allow for any issues to be addressed in a timely manner. The claim file should also be generated on a regular basis.
There are three methods available for completing shifts, with the first two managed manually either through the Approve Employee Timesheet page or the Schedule Board, whilst the third is a submission direct by the support worker using the Brevity Care Mobile application at the conclusion of their shift.
| Expand | ||
|---|---|---|
| ||
The first option for verifying that the times provided by the support workers where the same as what was scheduled is through the use of the approve timesheet function. You can optionally export a list of services for a support worker from the system to compare against the submitted timesheets by going to Employees > Reports menu option, specifying the date range, and then double-clicking the Timesheet report and selecting next on the filter screen – this can be exported to PDF and printed/filed.  When an employees has finished a shift through the Brevity Mobile App, you need to approve the employee’s timesheet to complete the shift. Once the shift is approved, the completed client services can be invoiced. To approve the employee’s timesheet observe the following steps:
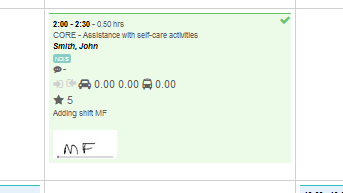
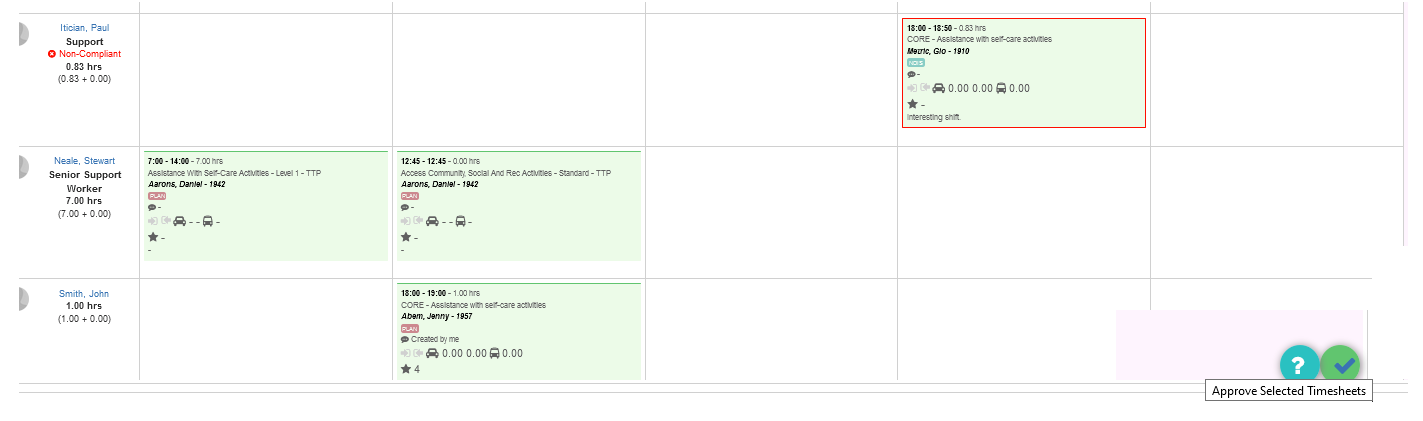  Once the Timesheet has been approved, you will observe a check mark at the upper right side of the shift, that indicates that the shift has been approved.
|
| Expand | ||
|---|---|---|
| ||
The second option is to manually complete a shift and auto-generate a timesheet for the support worker through the schedule board.  To do this select the Schedule shift (blue entries), and then click the |
| Expand | ||
|---|---|---|
| ||
This is the recommended way of receiving timesheets within Brevity as it reduces the time taken to verify manually submitted timesheets against the roster. |
Step 6: Generate Claim File
When generating claims or invoices, Brevity will pick up records for both completed and cancelled with charge services for processing into the claim file that match the selected funding source. There are two ways to generate a claim and they are:
Plan Managed and Cash service schedules that use the Invoice Batches to generate the claim.
NDIS service schedule uses the Funding claims to generate the claim.
To generate a claim file for NDIS funded service
Select the Client>Funding Claim sub-menu to open the funding claim list page.
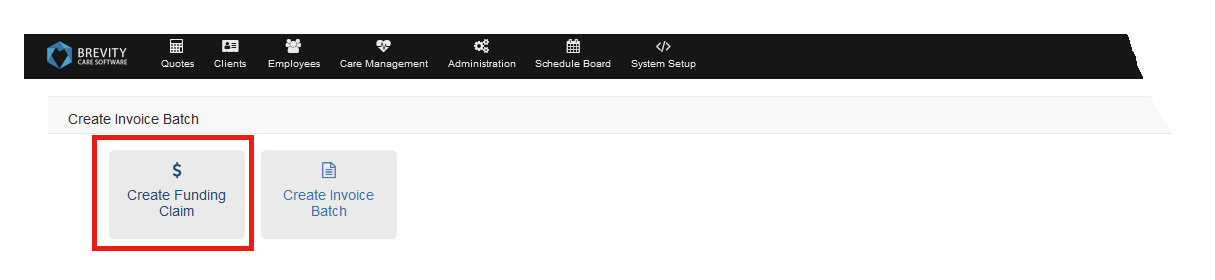
Select
new button to open the Create Invoice Batch screen.Select the Create Funding Claim button to begin generating a new funding Claim
Select NDIS as the Funding Source.
Key in the date range within the From date and To dates fields that will cover the schedules to be invoiced and written into the claim file.
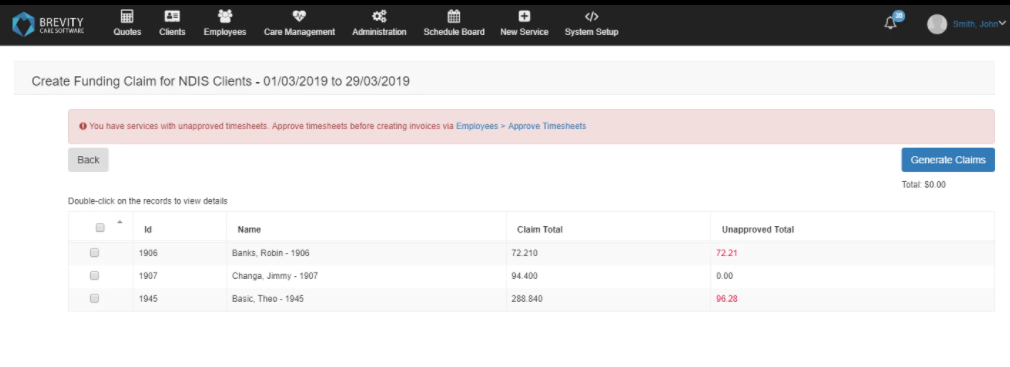
Select the NEXT button to list the Create Funding Claim for NDIS Clients - DD/MM/YYYY to DD/MM/YYYY page. This screen lists the schedules matching the date and funding criteria. If there are shifts that need to be approved it will show these as an error, that will need to be corrected, by approval through the Employee Approve Timesheet screen. The total for invoices to be written to the claim file will be listed.
You can double click the invoice line to review its details. The red text from the invoice detail indicates that the shift is unapproved from the employee's timesheet, whereas the black text indicates that the shift has been approved.
Select the schedules to be invoiced and written to the claim, followed by selecting the Generate Claim button.
A confirmation pop up will appear on the top portion of this window. Click on OK to confirm creation of the claim file.
After Generating the funding claim, you will be redirected to the funding claim batch record.
| Expand | ||
|---|---|---|
| ||
|


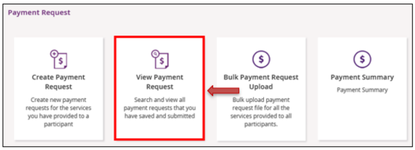
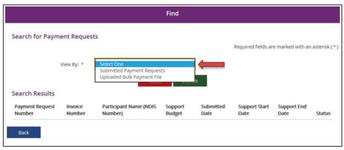
Step 7: Processing Payment Remittance
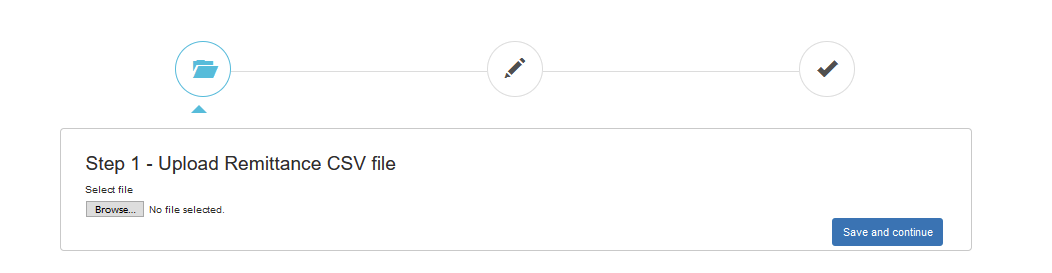
Brevity has built in functions to allow you to record which payments have been settled or rejected by NDIS, by uploading the remittance file that was downloaded from the NDIS portal. Brevity also allows you to correct issues for rejected claims files or invoice lines and generate a new claim file for those that where in error.
The flow of processing your remittance file is outlined as follows:
| Expand | ||
|---|---|---|
| ||
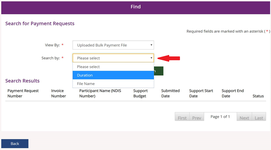
NDIS will make available a remittance file after a payment request has been processed. This will contain a list of all paid and rejected claims. Rejected claims will have rejection reason, that you will use to rectify and resubmit the claim.
You can then download the remittance csv file at the the bottom of the page via the Download Results button. |
| Expand | ||
|---|---|---|
| ||
|

| Expand | ||
|---|---|---|
| ||
You will be able to see rejected claims by returning to the Funding Claim record via Clients > Funding Claims. NDIS requires all claims to be unique, and you can't resubmit a claim with a reference number you previously used. Brevity facilitates this by copying the rejected claims to a new batch, allowing you to fix issues within the new batch, and downloading a new claim file from the new batch. To copy rejected claims to a new batch click the Generate New Claim button on the toolbar. To rectify issues with a claim, double-click the invoice within the Batch screen and update as required. |
| Expand | ||
|---|---|---|
| ||
Only invoices with the status Awaiting Payment are exported for claiming. To stop an invoice from being exported within a funding claim, set the status to Paid (if manually processed) or cancelled (if you no longer wish to claim for the services). To do this select the Manage Payments button on the toolbar of the funding claim list screen to present the Manage Payment Status page.  From the Manage Payment Status page, update the status of the invoice and assign the applicable comments. Select the save button to update the invoice record with the changes made. 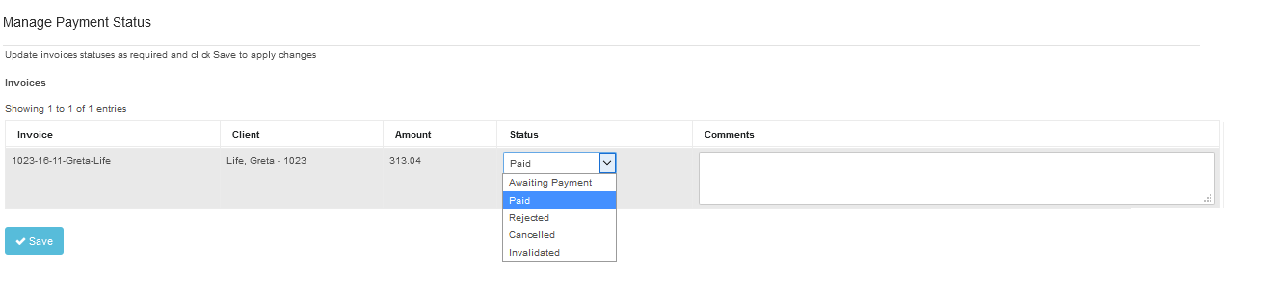 |